So you’ve learned about Ubuntu in Part 1, and now you’re ready to try it yourself? Awesome! Installing Ubuntu is easier than you think — whether on your main system or inside a virtual machine.
In this tutorial, we’ll walk through:
- System requirements
- Downloading Ubuntu
- Creating a bootable USB
- Dual boot or clean install
- (Optional) Installing in VirtualBox
Pro Tip: Bookmark this post and follow step by step with screenshots.
Minimum System Requirements for Ubuntu Desktop
Before you begin, make sure your PC meets the minimum requirements:
| Requirement | Recommended Specs |
| CPU | 2 GHz dual-core processor |
| RAM | 4 GB (8 GB for smooth use) |
| Storage | 25 GB minimum |
| USB Drive | At least 4 GB |
| OS Architecture | 64-bit |
| Internet | Required for updates |
Compare Ubuntu vs Windows
Step 1: Download Ubuntu ISO File
- Go to the official Ubuntu download page
- Choose Ubuntu Desktop LTS (Long Term Support – recommended)
- Click Download
Tip: LTS versions are more stable and get 5 years of updates.
Step 2: Create a Bootable USB Drive
To install Ubuntu on your PC, you’ll need to burn the ISO to a USB drive.
Tools you can use:
- Windows users: Rufus
- macOS/Linux users: BalenaEtcher
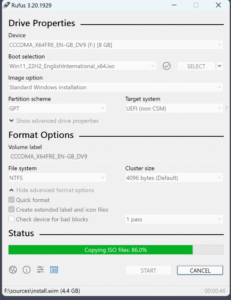
How to use Rufus (Windows):
- Insert USB stick (min 4 GB)
- Open Rufus → Select downloaded ISO
- File system: FAT32
- Partition scheme: MBR (for BIOS) or GPT (for UEFI)
- Click Start
Step 3: Boot from USB
Now, let’s boot the system from the USB:
- Restart your PC
- Enter BIOS/Boot Menu (usually F2, F12, Esc, or Del)
- Choose USB Drive as the boot option
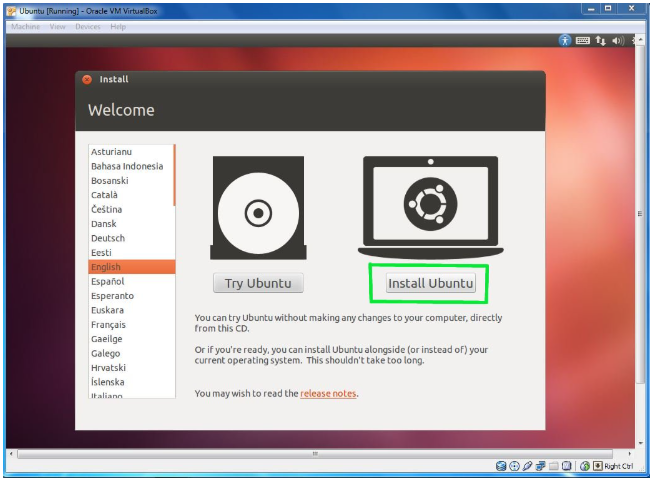
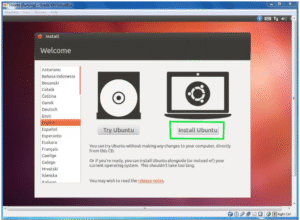
Once it loads, you’ll see:
Try Ubuntu
Install Ubuntu
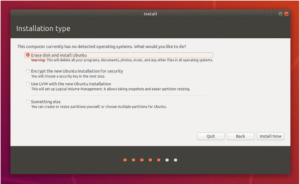
Step 4: Choose Install Type
You’ll be asked to choose how you want to install Ubuntu:
Option 1: Dual Boot (with Windows)
- Keeps Windows and Ubuntu side-by-side
- Ubuntu adds a boot menu on startup
Option 2: Clean Install
- Wipes everything and installs Ubuntu as your only OS
- Best if you’re done with Windows or it’s a fresh PC
Tip: Back up your data before continuing!
Step 5: Set Up Ubuntu
Follow the guided steps:
- Choose keyboard layout
- Connect to Wi-Fi
- Select “Normal Installation”
- Allocate disk space (auto works fine)
- Create user account & password
- Wait for installation to complete (~15–25 mins)
Your system will prompt you to Restart. Remove the USB stick when it says so.
That’s it! Welcome to Ubuntu!
Bonus: Install Ubuntu in VirtualBox (Optional)
If you don’t want to install Ubuntu on your real system yet, you can try it virtually.
Steps:
- Download and install VirtualBox
- Click New → Name: Ubuntu → Type: Linux → Version: Ubuntu (64-bit)
- Assign RAM (4 GB+)
- Choose ISO file as the optical disk
- Start VM → Follow same install steps
Perfect for testing, learning, or development.
Final Thoughts
Installing Ubuntu may seem intimidating at first, but once you do it, you’ll realize how empowering it is. Whether you’re switching from Windows or just experimenting with Linux — you’ve taken a huge step toward learning open-source technology.
Stay tuned for Part 3: Getting Started with Ubuntu Desktop Environment
Need help? Drop a comment or message!