You’ve learned the SQL basics, joins, keys, and how to normalize a database. Now it’s time to put that knowledge into action with a hands-on mini project.
In this beginner-friendly project, you’ll:
- Create tables for students, courses, and enrollments
- Insert sample data
- Write basic queries
- Normalize and connect tables using keys
Let’s build your first real database step by step.
Step 1: Plan Your Tables
We’ll create three related tables:
- students — holds basic student info
- courses — stores course details
- enrollments — links students to courses (many-to-many)
This structure follows best practices for relational design.
Table Structure Overview
Table: students
| Column | Data Type | Description |
| student_id | INT PRIMARY KEY | Unique student ID |
| name | VARCHAR(50) | Student’s full name |
| VARCHAR(100) | Email address |
Table: courses
| Column | Data Type | Description |
| course_id | INT PRIMARY KEY | Unique course ID |
| course_name | VARCHAR(100) | Name of the course |
Table: enrollments
| Column | Data Type | Description |
| enrollment_id | INT PRIMARY KEY | Unique enrollment ID |
| student_id | INT | Foreign key → students |
| course_id | INT | Foreign key → courses |
| date_enrolled | DATE | Enrollment date |
We’re using primary and foreign keys to connect the tables.
Step 2: Create the Tables
CREATE TABLE students (
student_id INT PRIMARY KEY,
name VARCHAR(50),
email VARCHAR(100)
);
CREATE TABLE courses (
course_id INT PRIMARY KEY,
course_name VARCHAR(100)
);
CREATE TABLE enrollments (
enrollment_id INT PRIMARY KEY,
student_id INT,
course_id INT,
date_enrolled DATE,
FOREIGN KEY (student_id) REFERENCES students(student_id),
FOREIGN KEY (course_id) REFERENCES courses(course_id)
);
Step 3: Insert Sample Data
INSERT INTO students VALUES
(1, ‘Ali’, ‘ali@example.com’),
(2, ‘Zara’, ‘zara@example.com’),
(3, ‘Ayesha’, ‘ayesha@example.com’);
INSERT INTO courses VALUES
(101, ‘Math’),
(102, ‘Physics’),
(103, ‘Computer Science’);
INSERT INTO enrollments VALUES
(1, 1, 101, ‘2025-06-01’),
(2, 1, 102, ‘2025-06-05’),
(3, 2, 103, ‘2025-06-10’);
If you’re unsure how to insert or update, revisit SQL basics.
Step 4: Query the Database
- Show all students:
SELECT * FROM students;
- List all enrollments with student names and course names:
SELECT s.name, c.course_name, e.date_enrolled
FROM enrollments e
JOIN students s ON e.student_id = s.student_id
JOIN courses c ON e.course_id = c.course_id;
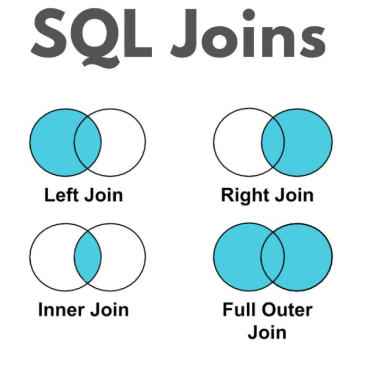
This is an example of an INNER JOIN.
- Find students enrolled in more than one course:
SELECT student_id, COUNT(*) as course_count
FROM enrollments
GROUP BY student_id
HAVING COUNT(*) > 1;
What You’ve Practiced
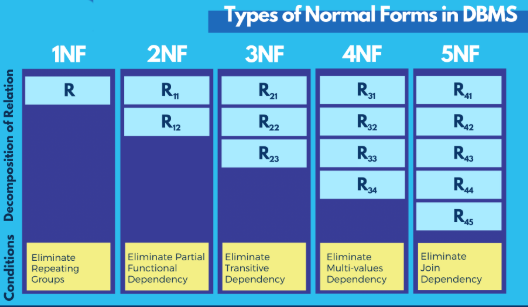
- Creating normalized tables using 1NF–3NF
- Using primary/foreign keys to enforce structure
- Writing JOINs and GROUP BY queries
- Designing a scalable, real-world database
Got stuck anywhere or want to share your results?
Leave a comment below — I’d love to hear how your student database project went!